派生と継承
隠ぺい化の次のステップとして、派生・継承を説明する。
派生を使わずに書くと…
元となるデータ構造(例えばPersonが名前と年齢)でプログラムを作っていて、 途中でその特殊パターンとして、所属と学年を加えた学生(Student)という データ構造を作るとする。
// 元となる構造体(Person)
struct Person {
   char name[ 20 ] ; // 名前
   int  age ;        // 年齢
} ;
// 初期化関数
void set_Person( struct Person* p ,
                 char s[] , int x ) {
   strcpy( p->name , s ) ;
   p->age = x ;
}
// 表示関数
void print_Person( struct Person* p ) {
   printf( "%s %d\n" , p->name , p->age ) ;
}
void main() {
   struct Person saitoh ;
   set_Person( &saitoh , "t-saitoh" , 50 ) ;
   print_Person( &saitoh ) ;
}
パターン1(そのまんま…)
上記のPersonに、所属と学年を加えるのであれば、以下の方法がある。 しかし以下パターン1は、要素名がname,ageという共通な部分があるようにみえるが、 プログラム上は、PersonとPersonStudent1は、まるっきり関係のない別の型にすぎない。
このため、元データと共通部分があっても、同じ処理を改めて書き直しになる。
// 元のデータに追加要素(パターン1)
struct PersonStudent1 {
   char name[ 20 ] ; // 名前
   int  age ;        // 年齢
   char dep[ 20 ] ;  // 所属
   int  grade ;      // 学年
} ;
void set_PersonStudent1( struct PersonStudent1* p ,
                         char s[] , int x ,
                         char d[] , int g ) {
   strcpy( p->name , s ) ; // 同じことを書いてる
   p->age = x ;
   strcpy( p->dep , d ) ;  // 追加分はしかたない
   p->grade = g ;
}
// 名前と年齢だけ表示
void print_PersonStudent1( struct PersonStudent1* p ) {
   // また同じ処理を書いてる
   printf( "%s %d\n" , p->name , p->age ) ;
}
void main() {
   struct PersonStudent1 yama1 ;
   set_PersonStudent1( &yama1 ,
                       "yama" , 22 , "PS" , 2 ) ;
   print_PersonStudent1( &yama1 ) ;
}
パターン2(元データの処理を少し使って…)
パターン1では、同じような処理を何度も書くことになり、面倒なので、 元データ用の関数をうまく使うように書いてみる。
// 元のデータに追加要素(パターン2)
struct PersonStudent2 {
   struct Person person ;
   char          dep[ 20 ] ;
   int           grade ;
} ;
void set_PersonStudent2( struct PersonStudent2* p ,
                         char s[] , int x ,
                         char d[] , int g ) {
   // Personの関数を部分的に使う
   set_Person( &(p->person) , s , x ) ;
   // 追加分はしかたない
   strcpy( p->dep , d ) ;
   p->grade = g ;
}
void print_PersonStudent2( struct PersonStudent2* p ) {
   // Personの関数を使う。
   print_Person( &p->person ) ;
}
void main() {
   struct PersonStudent2 yama2 ;
   set_PersonStudent2( &yama2 ,
                       "yama" , 22 , "PS" , 2 ) ;
   print_PersonStudent2( &yama2 ) ;
}
このパターン2であれば、元データ Person の処理をうまく使っているので、 プログラムの記述量を減らすことはできるようになった。
しかし、print_PersonStudent2() のような処理は、元データ構造が同じなのに、 いちいちプログラムを記述するのは面倒ではないか?
そこで、元データの処理を拡張し、処理の流用ができないであろうか?
基底クラスから派生クラスを作る
オブジェクト指向では、元データ(基底クラス)に新たな要素を加えたクラス(派生クラス)を 作ることを「派生」と呼ぶ。派生クラスを定義するときは、クラス名の後ろに、 「:」「public/protected/private」基底クラス名を書く。
// 基底クラス
class Person {
private:
   char name[ 20 ] ;
   int  age ;
public:
   Person( const char s[] , int x ) {
      strcpy( name , s ) ;
      age = x ;
   }
   void print() {
      printf( "%s %d\n" , name , age ) ;
   }
} ;
// 派生クラス
class Student : public Person {
private:
   char dep[ 20 ] ;
   int  grade ;
public:
   Student( const char s[] , int x ,
            const char d[] , int g )
            : Person( s , x ) // 基底クラスのコンストラクタ
   {
      strcpy( dep , d ) ;
      grade = g ;
   }
} ;
void main() {
   Person saitoh( "t-saitoh" , 50 ) ;
   saitoh.print() ;
   Student yama( "yama" , 22 , "PS" , 2 ) ;
   yama.print() ;
}
ここで注目すべき点は、main()の中で、Studentクラス”yama”に対し、yama.print() を呼び出しているが、パターン2であれば、print_PersonStudent2()に相当するプログラムを 記述していない。 しかし、この派生を使うと Person の print() が自動的に流用することができる。 これは、基底クラスのメソッドを「継承」しているから、 このように書け、名前と年齢「yama 22」が表示される。
さらに、Student の中に、以下のような Student 専用の新しい print()を記述してもよい。
class Student ...略... {
   ...略...
   void print() {
      Person::print() ;
      printf( "%s %d\n" , dep , grade ) ;
   }
} ;
void main() {
   ...略...
   Student yama( "yama" , 22 , "PS" , 2 ) ;
   yama.print() ;
}
この場合は、継承ではなく機能が上書き(オーバーライト)されるので、 「yama 22 / PS 2」が表示される。
派生クラスを作る際の後ろに記述した、public は、他にも protected , private を 記述できる。
public    だれもがアクセス可能。
protected であれば、派生クラスからアクセスが可能。
派生クラスであれば、通常は protected で使うのが一般的。
private   派生クラスでもアクセス不可。
仮想関数への伏線
上記のような派生したプログラムを記述した場合、以下のようなプログラムでは何が起こるであろうか?
class Student ... {
   :
   void print() {
      Person::print() ;                    // 名前と年齢を表示
      printf( " %s %d¥n" , dep , grade ) ; // 所属と学年を表示
   }
} ;
void main() {
   Person saitoh( "t-saitoh" , 53 ) ;
   saitoh.print() ; // t-saitoh 53

   Student mitsu( "mitsuki" , 18 , "E" , 4 ) ;
   Student ayuka( "ayuka" , 16 , "EI" , 2 ) ;
   mitsu.print() ; // mitsuki 18 / E 4   名前,年齢,所属,学年を表示
   ayuka.print() ; // ayuka 16 / EI 2    名前,年齢,所属,学年を表示

   Person* family[] = {
      &saitoh , &mitsu , &ayuka ,  // 配列の中に、Personへのポインタと
   } ;                             // Studentへのポインタが混在している
                                   // 派生クラスのポインタは、
                                   // 基底クラスのポインタとしても扱える
   for( int i = 0 ; i < 3 ; i++ )
      family[ i ]->print() ;       // t-saitoh 53/mitsuki 18/ayuka 16
}                                  //  が表示される。
様々なメモリ確保
前回の授業で説明していたような、必要に応じて確保するメモリは、動的メモリと呼ばれる。
動的メモリも、局所変数やalloca()を用いたスタック領域と、malloc()とfree()を使うヒープメモリ領域に分類される。
strdup
前回の文字列の確保の説明では、malloc()とstrcpy()をあわせて実行していたが、C言語ではこういった処理が多いので、専用の関数 strdup() がある。
char str[] = "abcdefg" ;
char*pc ;
if ( (pc = (char*)malloc( strlen( str ) + 1 )) != NULL ) {
   strcpy( pc , str ) ;
}
// おなじことを strdup では...
pc = strdup( str ) ;
様々なメモリ確保
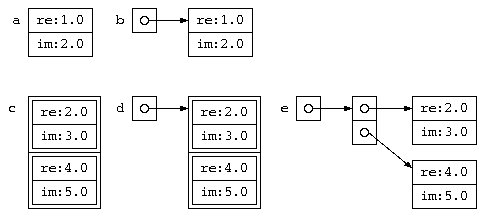
自分で定義した構造体を、malloc で領域確保しながら使う場合、1次元配列や2次元配列を作る場合、色々な確保の方法がある。
// 複素数を例に
struct Complex {
   double re ;
   double im ;
} ;
// 基本
struct Complex a ;
a.re = 1.0 ;
a.im = 2.0 ;
// ポインタで確保
struct Complex* b ;
b = (struct Complex*)malloc( sizeof( struct Complex ) ) ;
if ( b != NULL ) {
   b->re = 1.0 ;
   b->im = 2.0 ;
}
// 一次元配列
struct Complex c[ 2 ] ;  // 通常の使い方
c[0].re = 2.0 ;
c[0].im = 3.0 ;
c[1].re = 4.0 ;
c[1].im = 5.0 ;
// 一次元配列を動的に確保
struct Complex* d ;      // Complexの配列
d = (struct Complex*)malloc( sizeof( struct Complex ) * 2 ) ;
if ( d != NULL ) {
    d[0].re = 2.0 ; d[0].im = 3.0 ;
    d[1].re = 4.0 ; d[1].im = 5.0 ;
}
// 一次元のポインタ配列
struct Complex* e[ 2 ] ; // Complexのポインタの配列
e[0] = (struct Complex*)malloc( sizeof( struct Complex ) ) ;
if ( e[0] != NULL ) {
    e[0]->re = 2.0 ; e[0]->im = 3.0 ;
}
e[1] = (struct Complex*)malloc( sizeof( struct Complex ) ) ;
if ( e[1] != NULL ) {
    e[1]->re = 4.0 ; e[1]->im = 5.0 ;
}

C++での new, delete 演算子
複雑なデータ構造のプログラムを作成する場合には、このような malloc() , free() をよく使うが煩雑であるため、C++ではこれらをすっきりと記述するために、new 演算子、delete 演算子があり、それぞれ malloc(), free() に相当する。
// 単独
Complex* b = new Complex ;
b->re = 1.0 ;
b->im = 2.0 ;
delete b ;
// 配列
Complex* d = new Complex[2] ;
d[0].re = 2.0 ;
d[0].im = 3.0 ;
d[1].re = 4.0 ;
d[1].im = 5.0 ;
delete[] d ;  // 配列のdeleteには[]が必要
// ポインタの配列
Complex* e[2] ;
e[0] = new Complex ;
e[0]->re = 2.0 ;
e[0]->im = 3.0 ;
e[1] = new Complex ;
e[1]->re = 4.0 ;
e[1]->im = 5.0 ;
delete e[0] ;
delete e[1] ;
2次元配列
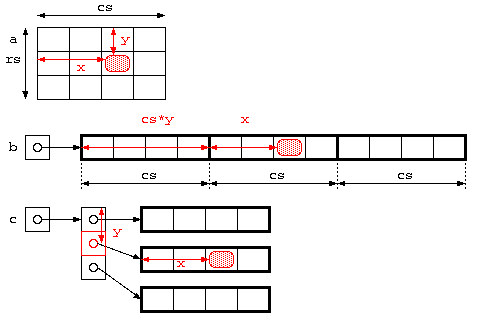
2次元配列の扱いでも、注意が必要。
int cs = 何らかの値 ; // データ列数
int rs = 何らかの値 ; // データ行数
int a[ rs ][ cs ] ;  // C言語ではエラー
a[ y ][ x ] = 123 ;

// 1次元配列を2次元配列のように使う
int* b ;
b = (int*)malloc( sizeof( int ) * rs * cs ) ;
b[ y * cs + x ] = 123 ;  // b[ y ][ x ] への代入

// 配列へのポインタの配列
int** c ;
c = (int**)malloc( sizeof( int* ) * rs ) ;  // NULLチェック省略
c[0] = (int*)malloc( sizeof( int ) * cs ) ;
c[1] = (int*)malloc( sizeof( int ) * cs ) ;
:
c[ y ][ x ] = 123 ;

レポート課題
メモリの動的確保の理解のために、自分の理解度に応じて以下のプログラムのいずれかを作成せよ。
ただし、プログラム作成時には、配列サイズは未定で、プログラム起動時に配列サイズを入力するものとする。
- 固定長の名前で、人数が不明。
- 長い名前かもしれない名前で、人数も不明
- 複素数のデータで、データ件数が不明。
- 名前と電話番号のデータで、データ件数が不明。
このような状況で、データを入力し、検索などの処理を通して自分のプログラムが正しく動くことを検証せよ。
レポートには、プログラムリスト、プログラムの説明、動作確認した結果、考察を記載すること。
C++のvectorクラスを使ったら
// C++であればvectorクラスを使えば配列なんて簡単
#include <vector>
int main() {
   // 1次元配列
   std::vector<int> a( 10 ) ;
   for( int i = 0 ; i < 10 ; i++ )
      a[ i ] = i ;
   // 2次元配列
   std::vector< std::vector<int> > b( 9 , std::vector<int>(9) ) ;
   //                           ↑ ここの空白は重要
   for( int i = 0 ; i < 9 ; i++ ) {    // ">>" と書くとシフト演算子
      for( int j = 0 ; j < 9 ; j++ ) { // "> >" と書くと2つの">"
         b[i][j] = (i+1) * (j+1) ;
      }
   }
   return 0 ;
}