テスト前のリスト導入の復習
前回のリスト構造の導入では、配列のデータに次のデータの入っている番号を添えることで途中にデータを挿入できるデータ構造の説明をした。
 また、それをクラスを用いたプログラムを示した。
ヒープメモリとは
Javaでは、すべてのオブジェクトはヒープメモリに保存する。
ヒープメモリとは、一時的なデータの保管場所であり、new 演算子でデータを保存する場所を確保する。
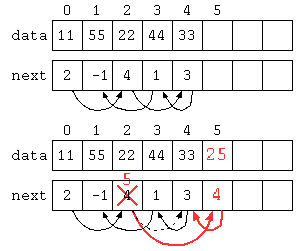
Javaでは、分かり難いのでC言語で説明を行う。malloc() は、指定されたバイト数のメモリをヒープ領域に確保する命令。malloc() に失敗すると、NULL が返ってくる。また、使い終わったら malloc() の領域は free() 命令で返却が必要となる。
((( 配列をヒープメモリで確保 )))
#include <stdio.h>
#include <stdlib.h>

int main() {
   int a[ 5 ] = { 1 , 2 , 3 , 4 , 5 } ;
   int* b ;
   if ( (b = (int*)malloc( sizeof( int ) * 5 )) != NULL ) {
      for( int i = 0 ; i < 5 ; i++ )
         b[ i ] = i + 1 ;
      free( b ) ;    // malloc() で確保したメモリ領域は返却が必要
   }
   return 0 ;
}

((( オブジェクトをヒープメモリに確保 )))
struct Complex {
   double re ;
   double im ;
} ;
int main() {
   struct Complex* c ;
   if ( (c = (struct Complex*)malloc( sizeof( struct Complex ) )) != NULL ) {
      c->re = 1.23 ;
      c->im = 2.34 ;
      free( c ) ;
      return 0 ;
   } else {
      printf( "No heap memory\n" ) ;
      return 1 ;
   }
}

((( 上記C言語をJavaで書くと )))
class Complex {
   double re ;
   double im ;
   Complex( double r , double i ) {
      this.re = r ;
      this.im = i ;
   }
}

public class Main {
   public static void main( String[] args ) {
      try {
         Complex c = new Complex( 1.23 , 2.34 ) ;
                    // Javaではヒープメモリが確保に失敗したら、
                    // OutOfMemoryErrorの例外が発生する。

         c = null ; // free()はJavaでは不要
                    // nullを代入してもいい。
      } catch( OutOfMemoryError e ) {
         System.out.println( "No heap memory" ) ;
         System.exit( 1 ) ;
      }
   }
}
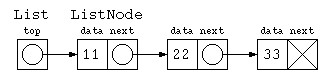
リスト構造 ListNode
前述の data と next で次々とデータを続けて保存する方法を、next の部分を次のデータへの参照を用いるように、リスト構造(連結リスト)を定義する。
import java.util.*;
class ListNode {
int data ; // データ部分
ListNode next ; // 次のデータへの参照
// コンストラクタ
ListNode( int d , ListNode nx ) {
this.data = d ;
this.next = nx ;
}
} ;
public class Main {
public static void main(String[] args) throws Exception {
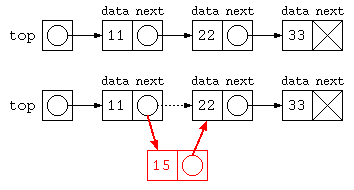
ListNode top = new ListNode( 11 , new ListNode( 22 , new ListNode( 33 , null ) ) ) ;
for( ListNode p = top ; p != null ; p = p.next )
System.out.println( p.data ) ;
// 途中にデータを入れる
top.next = new ListNode( 15 , top.next ) ;
for( ListNode p = top ; p != null ; p = p.next )
System.out.println( p.data ) ;
}
}
リスト操作
リスト構造に慣れるために簡単な練習をしてみよう。リスト構造のデータに対するメソッドをいくつか作ってみよう。print() や sum() を参考に、データ数を求める count() , 最大値を求める max() , データを検索する find() を完成させてみよう。
class ListNode {
    (略)
} ;

public class Main {
    static void print( ListNode p ) {   // リストを表示
        for( ; p != null ; p = p.next )
            System.out.print( p.data + " " ) ;
        System.out.println() ;
    }

    static int sum( ListNode p ) {      // リストの合計を求める
        int s = 0 ;
        for( ; p != null ; p = p.next )
            s += p.data ;
        return s ;
    }

    static int count( ListNode p ) {    // データ件数を数える

    }

    static int max( ListNode p ) {      // データの最大値を求める

    }

    static boolean find( ListNode p , int key ) { // データ列の中から特定のデータを探す
                                                  //   見つかったら true , 見つからなければ false
    }
    public static void main(String[] args) throws Exception {
        ListNode top = new ListNode( 11 , new ListNode( 22 , new ListNode( 33 , null ) ) ) ;
        print( top ) ;
        System.out.println( "合計:" + sum( top ) ) ;
        System.out.println( "件数:" + count( top ) ) ;
        System.out.println( "最大:" + max( top ) ) ;
        System.out.println( "検索:" + (find( top , 22 )
                                       ? "みつかった" : "みつからない" ) ) ;
    }
}
オブジェクト指向っぽく書いてみる
前述のプログラムでは、print( top ) のように使う static な関数としてプログラムを書いていた。しかし、オブジェクト指向であれば、オブジェクトに対するメソッドだと top.print() のように書きたい。この場合だと、以下のように書くかもしれない。
import java.util.*;

class ListNode {
    int data ;
    ListNode next ;
    ListNode( int d , ListNode n ) {
        this.data = d ;
        this.next = n ;
    }
    void print() {   // リストの全データを表示
        for( ListNode p = this ; p != null ; p = p.next )
            System.out.print( p.data + " " ) ;
        System.out.println() ;
    }
    int sum() {    // リストの合計を求める
        int  s = 0 ;
        for( ListNode p = this ; p != null ; p = p.next )
            s += p.data ;
        return s ;
    }
} ;

public class Main {
    public static void main(String[] args) throws Exception {
        ListNode top = new ListNode( 11 , new ListNode( 22 , new ListNode( 33 , null ) ) ) ;
        top.print() ;
        System.out.println( "合計: " + top.sum() ) ;

        ListNode list_empty = null ;
        list_empty.print() ;  // 実行時エラー java.lang.NullPointerException ぬるぽ!
    }
}
しかし、データ件数 0件 に対してメソッドを呼び出せない。
ListNode と List というクラスで書いてみる
ひとつの方法として、リストの先頭だけのデータ構造を宣言する方法もある。
class ListNode {
    int   data ;
    ListNode next ;
    ListNode( int d , ListNode n ) {
        this.data = d ;
        this.next = n ;
    }
} ;

class List {
    ListNode top ;
    List( ListNode p ) {
        this.top = p ;
    }
    void print() {
        for( ListNode p = top ; p != null ; p = p.next )
            System.out.print( p.data + " " ) ;
        System.out.println() ;
    }
} ;

public class Main {
    public static void main(String[] args) throws Exception {
        List list = new List( new ListNode( 11 , new ListNode( 22 , new ListNode( 33 , null ) ) ) ) ;
        list.print() ;

        List list_empty = new List( null ) ;
        list_empty.print() ;
    }
}
しかし、List と ListNode の2つのデータの型でプログラムを書くのは面倒くさい。
授業ではシンプルに説明したいので、今後はこの方法は極力避けていく。
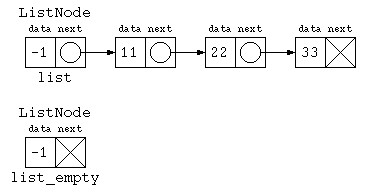
先頭にダミーデータを入れる
複数のクラス宣言するぐらいなら、リストデータの先頭は必ずダミーにしておく方法もあるだろう。
import java.util.*;

class ListNode {
    int data ;
    ListNode next ;
    ListNode( int d , ListNode n ) {
        this.data = d ;
        this.next = n ;
    }
    void print() {   // リストの全データを表示
        for( ListNode p = this.next ; p != null ; p = p.next )
            System.out.print( p.data + " " ) ;
        System.out.println() ;
    }
} ;

public class Main {
    public static void main(String[] args) throws Exception {
        ListNode list = new ListNode( -1 , null ) ;
        list.next = new ListNode( 11 , new ListNode( 22 , new ListNode( 33 , null ) ) ) ;
        top.print() ;
        System.out.println( "合計: " + top.sum() ) ;

        ListNode list_empty = new ListNode( -1 , null ) ;
        list_empty.print() ;
    }
}
以降、必要に応じて、先頭にダミーを入れる手法も取り混ぜながらプログラムを書くこととする。
入力データをリストに追加
入力しながらデータをリストに格納する処理を考えてみる。
リストでデータを追加保存するのであれば、一番簡単なプログラムは、以下のように先頭にデータを入れていく方法だろう。
class ListNode {
    (略)
    void print() {
        for( ListNode p = this ; p != null ; p = p.next )
            System.out.print( p.data ) ;
        System.out.println() ;
    }
} ;

public class Main {
    public static void main(String[] args) throws Exception {
        int[] inputs = { 11 , 22 , 33 } ;
        ListNode top = null ;

        for( int datum : inputs )
            top = new ListNode( datum , top ) ;
        top.print() ;
    }
}
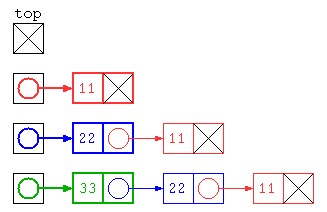
でもこの方法だと、先頭にデータを入れていくため、保存されたデータは逆順になってしまう。
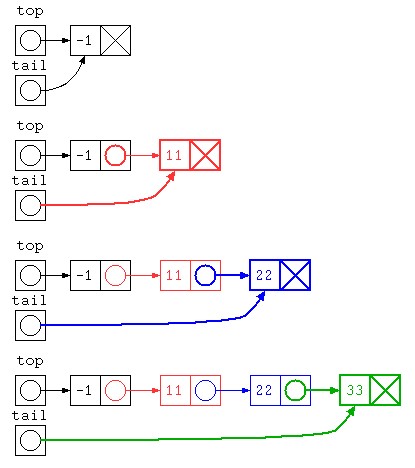
末尾にデータを入れる
逆順になるのを避けるのであれば、データを末尾に追加する方法があるだろう。ただし初期状態でデータが0件だと処理が書きづらいので、先頭にダミーを入れておく方法で書いてみる。
public class Main {
    public static void main(String[] args) throws Exception {
        int[] test_data = { 11 , 22 , 33 } ;

        ListNode top = new ListNode( -1 , null ) ; // ダミー
        ListNode tail = top ;
        for( int x : test_data ) {
            tail.next = new ListNode( x , null ) ;
            tail = tail.next ;
        }
        top.print() ; // -1   11  22  33
    }                 // ダミー
}