2分木に対する処理
前回の講義では、2分探索木に対する簡単な処理を考えてもらおう…で終わってしまったので、実際のプログラムも以下に示す。
import java.util.*;

class BTreeNode {
    int data ;
    BTreeNode left ;
    BTreeNode right ;

    BTreeNode( int x , BTreeNode l , BTreeNode r ) {
        this.data = x ;
        this.left = l ;
        this.right = r ;
    }
}
public class Main {
    public static void print_tree( BTreeNode p ) {
        if ( p != null ) {
            print_tree( p.left ) ;
            System.out.print( p.data + " " ) ;
            print_tree( p.right ) ;
        }
    }
    public static int count( BTreeNode p ) { // データ件数を数える
        if ( p == null )
            return 0 ;
        else
            return 1 + count( p.left )
                     + count( p.right ) ;
    }
    public static int sum( BTreeNode p ) {   // 合計を求める
        if ( p == null )
            return 0 ;
        else
            return p.data
                   + sum( p.left )
                   + sum( p.right ) ;
    }
    public static int max( BTreeNode p ) {   // 最大値を探す
        if ( p == null )
            return 0 ; /* 再帰を止めるためではなくnullポインタエラーを防ぐため */
        while( p.right != null )
            p = p.right ;
        return p.data ;
    }
    public static void main(String[] args) throws Exception {
        BTreeNode top = /*(略)*/ ;
        print_tree( top ) ;
        System.out.println() ;
        System.out.println( count( top ) ) ; // データ件数を数える
        System.out.println( sum( top ) ) ;   // 合計を求める
        System.out.println( max( top ) ) ;   // 最大値を探す
    }
}
2分探索木へのデータの追加
ここまでで説明していた2分探索木では、木の生成は top = new BTreeNode( … ) のように、直接、木の構造を作っていた。しかし実際には、データが与えられて、追加していくという処理が必要となる。この場合、以下のような処理で木へのデータの追加を行う。
Javaの場合
以下の Javaのプログラムの関数 entry( … ) では、再帰を使いながら、value を追加した木を返す関数で記述した。
特に、根となる top は、最初 null であり、追加により値を書き換えることから、top = entry( top , 値 ) ; のような処理で記述している。
import java.util.*;

class BTreeNode {
    int       data ;
    BTreeNode left ;
    BTreeNode right ;

    BTreeNode( int x , BTreeNode l , BTreeNode r ) {
        this.data  = x ;
        this.left  = l ;
        this.right = r ;
    }
}
public class Main {
    public static void print_tree( BTreeNode p ) {
        // 木構造をわかりやすくするために()をつけて表示
        if ( p != null ) {
            System.out.print( "(" ) ;
            print_tree( p.left ) ;
            System.out.print( p.data ) ;
            print_tree( p.right ) ;
            System.out.print( ")" ) ;
        }
    }
    public static BTreeNode entry( BTreeNode p , int value ) {
        if ( p == null ) {
            return new BTreeNode( value , null , null ) ;
        } else {
            if ( p.data == value )
                ; // 何もしない
            else if ( p.data > value )
                p.left = entry( p.left , value ) ;
            else
                p.right = entry( p.right , value ) ;
            return p ;
        }
    }
    public static void main(String[] args) throws Exception {
        BTreeNode top = null ;
        top = entry( top , 42 ) ;
        top = entry( top , 27 ) ;
        top = entry( top , 72 ) ;
        top = entry( top , 13 ) ;
        top = entry( top , 38 ) ;
        top = entry( top , 64 ) ;
        top = entry( top , 81 ) ;
        print_tree( top ) ; System.out.println() ;
    }
}
// 動作結果
// (((13)27(38))42((64)72(81)))
- 2分探索木へのデータの追加(Paiza.io)
しかしながらこのプログラムでは、以下のように小さい順序でデータを与えると、右にだけ伸びる木が作られてしまう。
    // 不均一な木ができる場合
    public static void main(String[] args) throws Exception {
        BTreeNode top = null ;
        top = entry( top , 13 ) ;
        top = entry( top , 27 ) ;
        top = entry( top , 38 ) ;
        top = entry( top , 42 ) ;
        top = entry( top , 64 ) ;
        top = entry( top , 72 ) ;
        top = entry( top , 81 ) ;
        print_tree( top ) ; System.out.println() ;
    }
    // 動作結果
    // (13(27(38(42(64(72(81)))))))
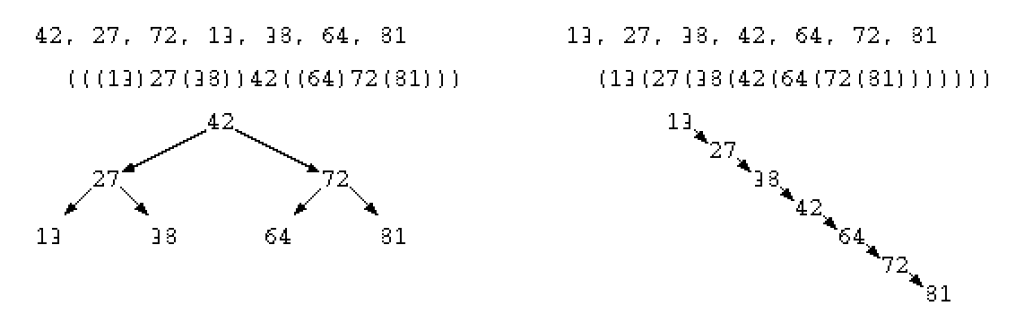
このような不均一な木が生成されてしまうと、本来であればデータ探索の処理時間は O( log N ) であるが、最悪の状態では O( N ) となってしまう。
AVL木
こういった偏った木が生成されてしまった時には、以下のような処理を加えると、不均一な状態を改善できる。
depth() 関数は与えられた木の深さを求める関数であり、左枝と右枝が大きく違う場所で 木の右回転を行う rotate_right() を実行する。
public class Main {
    public static int depth( BTreeNode p ) { // 木の深さを求める
        if ( p == null ) {
            return 0 ;
        } else {
            int l = depth( p.left ) ;
            int r = depth( p.right ) ;
            if ( l > r )
                return 1 + l ;
            else
                return 1 + r ;
        }
    }
    public static BTreeNode rotate_right( BTreeNode p ) {
        BTreeNode q = p.left ;      //      p
        BTreeNode r = q.right ;     //    / \
        q.right = p ;               //   q
        p.left  = r ;               // / \
        return q ;                  //      r
    }
    public static void main(String[] args) throws Exception {
        BTreeNode top = null ;
        top = entry( top , 86 ) ;
        top = entry( top , 53 ) ;
        top = entry( top , 92 ) ;
        top = entry( top , 11 ) ;
        top = entry( top , 65 ) ;
        top = entry( top , 22 ) ;
        // 不均一な状態を確認
        print_tree( top ) ;
        System.out.println() ;
        System.out.println( "p.left=" + depth( top.left ) ) ;
        System.out.println( "p.right=" + depth( top.right ) ) ;
        // top の右回転を実行
        top = rotate_right( top ) ;
        // 改善された状態を確認
        print_tree( top ) ;
        System.out.println() ;
        System.out.println( "p.left=" + depth( top.left ) ) ;
        System.out.println( "p.right=" + depth( top.right ) ) ;
    }
}
- AVL木と右回転(Paiza.io)
上記のプログラムでは、左枝が3段で右枝が1段であり不均一な状態となっている。
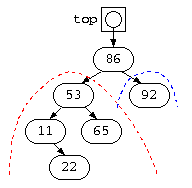
そこで、最上段の86の左枝を上に移動させるように枝の繋ぎ方を rotate_right() により変更している。実際には、繋ぎ変えを左回転させる処理も作る必要がある。
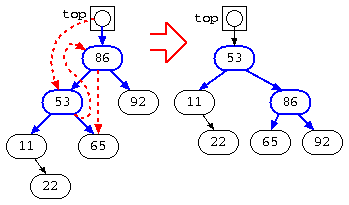 このように、木の枝の深さが不均一な場所で、このような処理を加えて均一化を図った木構造は AVL 木と呼ぶ。
AVL木は、考案した Velski と Landis の名前が由来(Adelson-Velskii and Landis’ tree)
具体的に、左右の depth() が大きく違う場所で、回転を加える処理については、プログラム全体が長くなるので、考え方の説明のみとする。